Creating trays
- Rabina Beepath
- Apr 17, 2020
- 3 min read
Updated: Apr 22, 2020
When tasked with creating slab trays, I realised how many trays I actually have at home and how much function and elegance they possess...

Above shows a picture of a slab tray I made featuring a braided-coil handle.
My tray Tragedy:
The very first tray that I attempted was the first time I made a clay piece at home. Naturally, there were a lot of struggles:
I forgot to periodically pick up my clay while rolling which caused the clay to stick to the canvas surface. I also left the base of my tray to dry for too long and left it on a wooden board, which I learned afterwards, sucks out all of the moisture. I waited too long to add texture to my piece. I attempted to add handles to the piece, but also learned afterwards that handles must be the same level of moisture to what they are being attached to, otherwise they will crack. Initially though, I thought adding coils would be okay, but eventually the tray broke. The handles came off and a ruler fell on it, causing it to crack . I was devastated, but knew that I could not be too hard on myself because from this little tragedy I actually learned a lot which helped me in making even better quality pieces afterwards....
Braided Serving Tray:
So. I sketched a plan to make a tray that utilised a mould to form its shape. In my design I contemplated adding handles, afraid that these too would break off. So I made my design bit versatile so that it would look complete with or without handles.
I had a tray at home that I covered in paper towels. After wedging, rolling, compressing and trimming my clay, I carefully draped my clay over my makeshift mould.
I then focused on creating a foot. From my research I liked the addition of a foot because I felt like it added some height to a piece and also gave it a more finished look.
I experimented with different shapes and eventually settled on rolling spheres out of clay and attached these to the four under side corners of the tray.
Still unsure about the handles, I secured my tray with plastic so that it would not dry out (like how my first tray did)
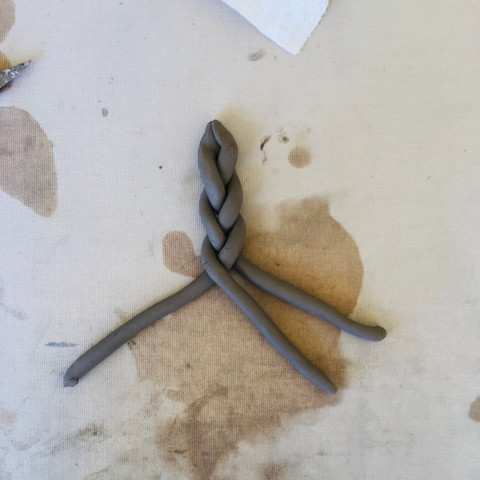
In the morning I attempted to make some handles by weaving three coils in a braided pattern and attached it to my piece. I was very thrilled with the final result. It is one of my favourite pieces.
Round Tray with Indian-Inspired Imprint:

I was inspired by my travels to India and the wonderful architecture I saw. I found a hair pin in my jewellery box that had a similar shape to the arches at Agra Fort located in Agra, India. Agra Fort was the main residence of the emperors of the Mughal Dynasty until 1638, when the capital was shifted from Agra to Delhi. Before capture by the British, the last Indian rulers to have occupied it were the Marathas. With this as my inspiration I began to remake another rounded tray that was similar to the one that I broke.

With this design, I decided to not attach handles. Rather I attempted a cut-out handle.
I used my hair clip to imprint my design after wedging, rolling and compressing my clay.
I let the clay set up a bit before cutting out the handles and added a foot to my piece as well.
However, after I while, I realised that the thinner part of the handle was beginning to dry faster than the rest of the piece, and one side cracked. With no other alternative, I broke the other side of the handle so the piece would look even, and left it as is.
It was definitely not what I intended to create, but the piece still looked finished, and the part where the handle was supposed to be actually fit my thumbs nicely.
In the end, I was pleased with the final results.


Comments